Setting up Your OCaml Development Environment on OS X
Last fall, I began exploring the subject of functional programming as part of Professor David Walker’s COS 326 at Princeton. Throughout the course, we did all of our programing in OCaml. I also spent the past spring using OCaml for my CS Independent Work. So in total, I’ve spent a reasonable amount of time around the language, and I think it’s fantastic: it’s got a great module system, plenty of useful open source tools, etc.
But OCaml isn’t that widely used. And as a result, there aren’t very many good write-ups out there for setting up an OCaml development environment.
In this post, I’ll provide a couple of choices for setting up such an environment when developing on a Mac.
Getting the OCaml Source Code
To start, there are a few ways to get the actual source code for the OCaml language.
If you’re just doing low-key development, download the source code as follows:
- Go to the OCaml releases page.
- Select the precompiled Mac binary.
- Follow the instructions for installation, and you're done—super simple, and fast.
If you’re doing any significant development (i.e., large-scale projects), you will eventually need external packages. With that in mind, you’ll want to get the OCaml source code as part of the OCaml Package Manager (OPAM) download. OPAM, as it sounds, is a fantastic OCaml package manager, which can be acquired as follows:
-
If you’re lucky, one of the methods listed on the OPAM site may work for you. This includes installation via homebrew and MacPorts, but I had seemingly random, trivial bugs that caused most of these methods to fail for me.
-
With that in mind, I ran the following code from the OCaml installation page:
$ wget https://www.ocamlpro.com/pub/opam_installer.sh $ sh ./opam_installer.sh /usr/local/bin -
Warning: this takes a really long time—much longer than the above method because it has to download a bunch of libraries and dependencies.
-
Additionally, if you want to take this route, you’ll need to update your BASH path: ‘export PATH=$PATH:~/.opam/4.00.1/bin’ (or wherever you want your .opam folder located).
To make sure that you’ve installed the language properly, open up your Bash terminal and type ‘ocaml’. You should see the toplevel initialize, like this:
OCaml version 4.00.1

# let x = 2 in

let y = 3 in
x+y;;

- : int = 5
Setting up Your Development Environment
Next, you’ll want a high-quality editor that’s well integrated with the OCaml language. I’ve played around with three different editors/environments, all of which have had their pros and cons. Anyway, the process for setting up such environments is as follows:
Emacs (with Tuareg Mode)
Professor Walker was a big fan of playing around in the OCaml toplevel within the IDE. That is, loading your current module into the OCaml toplevel and playing around without having to leave the text editor. To do that, you need Tuareg mode. Follow these instructions:
-
Download the Emacs application for Mac here.
-
Open your terminal and type: ‘open ~’
-
Download and unzip Tuareg 2.0.4 and Tuareg Mode (downloads are hyperlinked). Move them into your home (~) directory. These instructions can be found here. Alternatively, you can use wget (good instructions for downloading wget, if you don’t have MacPorts or homebrew):
$ wget https://forge.ocamlcore.org/frs/download.php/516/tuareg-caml-mode.tar.gz $ wget https://forge.ocamlcore.org/frs/download.php/514/tuareg-2.0.4.tgz -
Open Emacs. Type: 'Ctrl+X Ctrl+F .emacs', which should open (or create) your .emacs file (located at ~/.emacs).
-
Paste the following code into your .emacs file:
(add-to-list 'load-path "~/tuareg-caml-mode")
(add-to-list 'load-path "~/tuareg-2.0.4")
(setq auto-mode-alist (cons '("\\.ml\\w?" . tuareg-mode) auto-mode-alist))
(autoload 'tuareg-mode "tuareg" "Major mode for editing Caml code" t)
(autoload 'camldebug "camldebug" "Run the Caml debugger" t)
Restart Emacs and Tuareg mode should be up and running. There are a number of useful commands for opening up the OCaml toplevel—here’s a good cheat sheet.
Eclipse (with OcaIDE)
OcaIDE is an OCaml plugin for Eclipse. It works reasonably well, with auto-completion across packages and all those cute tricks. Here are some step-by-step instructions for setting it up:
- Download Eclipse IDE for Java and DSL Developers or Eclipse Classic from this link.
- If you have any experience installing Eclipse plugins this shouldn’t be too hard. You can get the information from here, but it boils down to the following:
- Open your version of Eclipse.
- Go to: Help -> Install New Software.
- Hit add and enter 'OcaIDE' for name and https://www.algo-prog.info/ocaide/ for URL.
- Click through the licensing agreement and unsigned content warnings, as one does.
- Restart Eclipse.
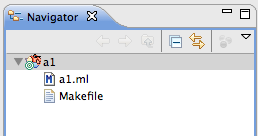
As an example usage of how you would arrange your folder hierarchy in Eclipse:
- Download a sample project, e.g., a1 (download).
- Create a COS 326 folder and place a1 inside of it.
- Launch eclipse and select COS 326 as your workspace. Type: “command+N –> OCaml –> OCaml Empty Makefile Project”, and all your stuff should be there with the correct perspective activated, as below.
One issue: the default behavior of Eclipse (with OcaIDE) is to try and re-build every time you save. This gives you error messages like this:
$ ocamlc -o a1 [a1.ml](https://a1.ml/)
$ make: ocamlc: No such file or directory
$ make: *** [a1] Error 1
which I’ve struggled to clean up. It also lags your computer for a few seconds.
I find this incredibly annoying, and, to be honest, it doesn't make sense to me that you would want your project to make every time you save: making can be very expensive, and saving isn't really an analogous operation. So I usually disable this feature and handle all my building on my own (i.e., from within my Bash shell). To do so, control-click on a1 (or whatever your project is); click 'Properties –> Builders’ and then uncheck ‘OCaml Makefile Builder’ and hit ‘Ok’.
NOTE: if you're using OPAM, then you'll have to go to properties (CTRL+,) –> OcaIDE –> Paths. Then, go to ~/.opam/4.00.1/bin, type 'pwd' (you need the full path, rather than '~') and paste the whole path into the ‘OCaml Binaries Directory’ field. Hit apply.
Sublime Text
Sublime Text is great. It’s quick, sexy, and lightweight, with plenty of room for customization. There’s an unlimited free trial available here. It doesn’t have any particular integration with OCaml (although it does provide correct syntax highlighting for your .ml and .mli files), but there’s a fantastic setup tutorial available here that describes how to get started and recommends some baseline packages.
In Conclusion
OCaml is a great language, and I wish it were more widely proliferated. Hopefully, this post will help you get developing as quickly as possible—if anything is unclear, just email me at [email protected] and I’ll do my best to help you debug.
2013-05-29